If you've ever gone down the rabbit hole of self-hosting services, you’ll quickly realize that a home lab is a never-ending project. There’s always something to optimize, some new tool to tinker with, or some service to migrate just because you can. My setup is no exception—it's a combination of necessity, experimentation, and a sprinkle of over-engineering.
I've refined my home lab over the years to serve multiple purposes: self-hosting applications, managing my media, running virtual machines, and automating my home. This post will take you through the insanity of how I manage everything under one roof, the services I run, and how I keep it accessible (but secure) from anywhere in the world.
Why Homelab?
Homelabbing started as a curiosity but quickly became an essential part of my digital life. Here’s why I built my homelab:
-
Self-Sufficiency
- I don’t want to rely on third-party services for storage, media, or automation. Why should a simple light bulb on my home network talk to a datacenter somewhere else?
- By self-hosting, I maintain control over my data, security, and privacy. Just like the safety of entering your own home, my homelab feels like safe place to tinker, away from prying eyes.
-
Learning & Experimentation
- Running a homelab has significantly improved my knowledge of networking, system administration, and security.
- I get hands-on experience with virtualization, Docker, reverse proxies, and automation.
-
Cost Savings in the Long Run
- While initial setup costs exist, self-hosting saves money over time by eliminating cloud storage and subscription-based media services.
- I avoid vendor lock-in and have the flexibility to customize my services exactly how I want.
-
Home Automation & Media Control
- Everything in my home—from lights to music—is automated and centrally managed. Don't want to keep the porch light on all night? Just turn it on when someone gets home for 5 minutes by tracking GPS location and making your lights smart!
- Streaming my personal media collection through Jellyfin is a better experience than relying on external streaming platforms.
-
Resilience & Redundancy
- I keep local backups of critical files, reducing the risk of data loss.
- My homelab is always accessible, even if my ISP has temporary issues, thanks to failover configurations.
If you enjoy tinkering, learning new things, and taking control of your digital world, a homelab is one of the most rewarding projects you can build. Ultimately, everyone does it differently, and there's no right way to do it!
Hardware Overview
Many think that running a Homelab requires a lot of power and performance-and more importantly-money! But actually, you can probably start it today and you don't realize it!
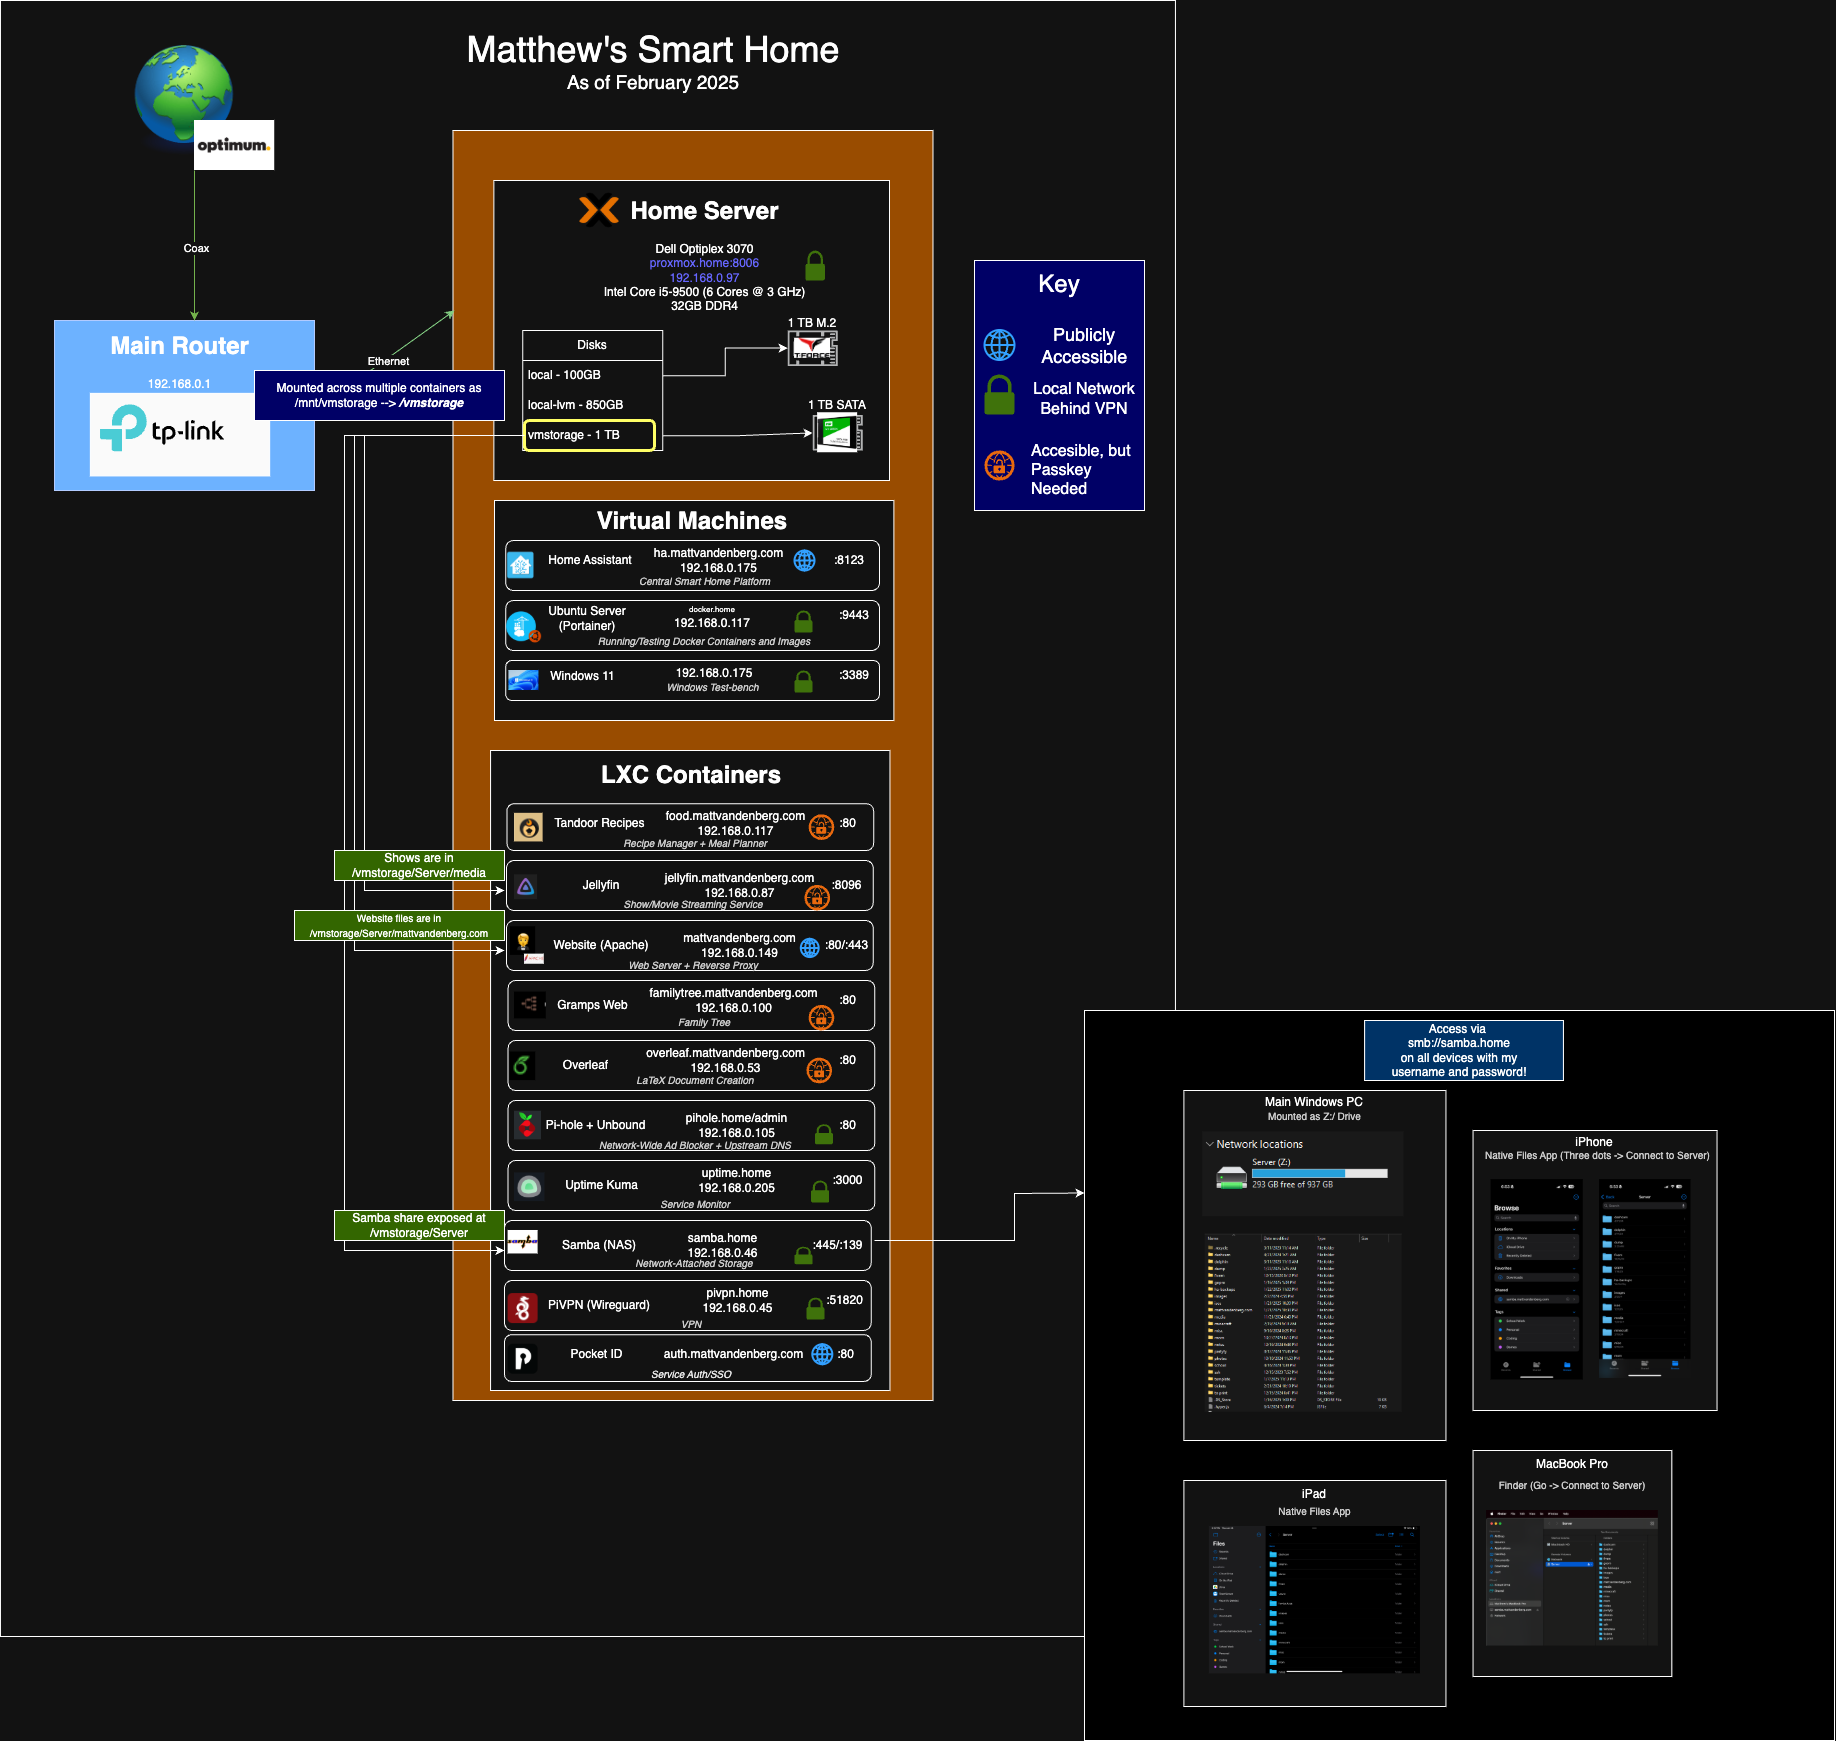
My homelab lives on an old Dell Optiplex 3070, repurposed into a full-fledged server! This machine houses an Intel Core i5-8500, 32GB of DDR4 RAM, and multiple storage devices:
- Primary Storage: 1TB NVMe SSD for the OS and critical applications
- Secondary Storage: 1TB SATA SSD for frequently accessed data
The best part-I paid maybe $100 for extra RAM and storage, that's it! It doesn't have to be expensive, even for the curious!
Networking & Remote Access
Since my homelab needs to be accessible from both inside and outside my home, networking plays a crucial role. My setup includes:
- Main Router: TP-Link, running stock firmware, assigned to 192.168.0.1. Very soon, though, when I move out, I really want to buy an additional NIC and run OPNSense on it. I'm currently lacking on VLANs because of that.
- Cloudflare DNS: My domain (mattvandenberg.com) is registered here and routes traffic to my home IP via A records.
- Reverse Proxy: Apache manages all incoming requests and routes them to the correct services.
How Traffic Reaches My Server
- A user requests one of my services (e.g.,
obsidian.mattvandenberg.com). - The request goes to Cloudflare DNS, which resolves my domain to my home IP address.
- My router forwards ports 80 (HTTP) and 443 (HTTPS) to my Apache reverse proxy.
- Apache determines if the request should be forwarded to a specific container or VM.
- If the request is for a public service, it gets routed immediately. If it requires authentication, it prompts for a password.
This setup allows me to expose certain services publicly while keeping others locked behind a VPN or authentication wall.

Virtual Machines & LXC Containers
My Proxmox server runs a mix of Virtual Machines (VMs) and LXC Containers, each serving a specific function.
Virtual Machines
- Home Assistant: Manages all my smart home automation, from lights to climate control. Gone are the days of devices only working on separate platforms.
- Ubuntu Server: Hosts additional applications that require more isolation. Used for Python scripting, Docker deployments, and general-purpose Linux tasks. This hosts:
- PocketID, an SSO provider to put behind some of my public services
- Tandoor Recipes, a recipe manager and meal planner
- Windows 11 VM: Used primarily for testing and remote access when I need a Windows environment.
LXC Containers
These are lightweight environments that allow me to run multiple services with minimal overhead. Here’s what’s currently running:
- Website (Apache):
mattvandenberg.com, reverse proxies other services and hosts my blog. - Minecraft Server: Seasonal when I'm in my Minecraft phase.
- Wireguard: VPN to access my local services when I'm away from home.
- Jellyfin: My personal media server for movies, TV shows, and music.
- Overleaf: A self-hosted LaTeX editor for writing documents.
- Pi-hole & Unbound: A self-hosted DNS server that blocks ads and trackers.
- Uptime Kuma: Monitors my self-hosted services and alerts me if anything goes down.
- Samba (NAS): A shared network drive for all my devices. Soon, I may convert this to TrueNAS when I get more drives.
Each container runs on its own local IP (192.168.0.x range) and is managed through Proxmox.
Security & Authentication
Given that some of my services are public-facing, security is a top priority. Here’s how I protect my homelab:
-
Reverse Proxy with Authentication
- Any non-public service requires a passkey before access is granted.
- Apache manages authentication before proxying requests.
-
Cloudflare Proxying & SSL
- All public services go through Cloudflare’s proxy, hiding my actual IP.
- Let’s Encrypt provides free SSL certificates, ensuring everything runs over HTTPS.
-
Firewall & Network Segmentation
- I block unauthorized access with my router’s firewall rules.
- Home automation and IoT devices are isolated on a separate Guest Network.
-
Automatic Backups & Monitoring
- Uptime Kuma tracks my services and alerts me of downtime.
- Rsync + Cron Jobs handle automatic backups to my external storage.
File & Media Access Across Devices
One of my favorite things about my homelab is how seamlessly everything syncs across my devices. Whether I’m on my MacBook Pro, iPhone, iPad, or PC, I can access:
- Jellyfin for media
- Samba for file storage
- Obsidian vault for notes & documentation
- and more!
iPhone & iPad Integration
I set up my iOS devices to mount my Samba shares, making my homelab feel like an extension of iCloud Drive—but without Apple’s storage limits or fees!
Why I Built This
Setting up a homelab wasn’t just about self-hosting—it was about learning, experimenting, and taking full control over my data. Over time, it became a central hub for everything I do, from managing my website to hosting my own media.
Would I recommend this setup to the average person? Probably not. But for anyone deep into self-hosting, automation, and networking, it’s a fun and rewarding challenge.
If you’re considering setting up your own homelab, start small and scale as you go. And if you’ve got any questions, feel free to reach out!